Introduction to Video Generation
DatBot’s video generation system transforms your ideas into professional videos using advanced AI. No cameras, no editing software, no video skills needed - just describe what you want to see, and watch it come to life.
✨ New: Magic Sequence - Let AI plan your entire video, generate images for each scene, and set up your sequence automatically. It’s like having a video producer, storyboard artist, and image creator all in one!
Two Powerful Creation Modes
Clip Mode
Perfect for quick, single-scene videos:
- One cohesive 4-12 second clip
- Single prompt describes entire video
- Great for social media clips
- Ideal for testing ideas quickly
- Fastest way to get results
Sequence Mode
For complex, multi-scene productions:
- Create videos up to several minutes long
- Multiple segments with different prompts
- Mix and match styles per segment
- Professional storytelling capabilities
- Full creative control
- Magic Sequence feature for AI-assisted planning
Start Simple!
Master Clip Mode first before diving into Sequence Mode. It’s the best way to understand how prompts translate to video.
Quality Tiers
Choose the right quality for your project:
Fast
- Speed: 1-2 minutes
- Quality: Good for drafts
- Use for: Quick tests, iterations
Standard
- Speed: 2-5 minutes
- Quality: Professional results
- Use for: Most final videos
Professional
- Speed: 5-10 minutes
- Quality: Cinema-grade output
- Use for: Premium projects
Video Styles Arsenal
Camera Movement Styles
Cinematic
- Hollywood-quality atmosphere
- Dramatic lighting and composition
- Perfect for trailers, teasers
Action
- Fast-paced, dynamic movement
- High energy cuts
- Great for sports, excitement
Handheld
- Documentary feel
- Raw, authentic look
- Adds immediacy and realism
Steady Cam
- Smooth, floating movement
- Professional tracking shots
- Ideal for tours, reveals
Drone
- Aerial perspectives
- Sweeping landscape shots
- Establishes scale and location
Special Effects Styles
Slow Motion
- Time stretched dramatically
- Reveals hidden details
- Emphasizes important moments
Timelapse
- Compress hours into seconds
- Show change over time
- Perfect for transformations
Stop Motion
- Charming, handcrafted feel
- Unique visual style
- Great for creative projects
Technical Styles
Tracking Shot
- Follows subjects smoothly
- Maintains focus on movement
- Professional documentation
Dolly Zoom
- Vertigo effect
- Creates disorientation
- Use sparingly for impact
Panning
- Horizontal reveals
- Survey scenes gradually
- Classic storytelling technique
Dramatic
- Enhanced emotional impact
- Strong lighting contrasts
- Powerful storytelling
Creating Videos: Step-by-Step
Clip Mode Workflow
- Access Video Generation
- Click media icon in sidebar
- Select “Video” tab
- Ensure “Clip” mode is selected
-
Write Your Prompt
Example: "A majestic eagle soaring through mountain peaks at sunrise, dramatic lighting, cinematic style" -
Configure Settings
- Duration: 5 seconds (anywhere from 4-12)
- Style: Choose from dropdown
- Quality: Start with Standard
- Aspect Ratio: 16:9 for most uses
-
Optional
- Add starting image for continuity
-
Generate and Wait
- Click “Generate Video”
- Monitor progress indicator
- Preview when complete
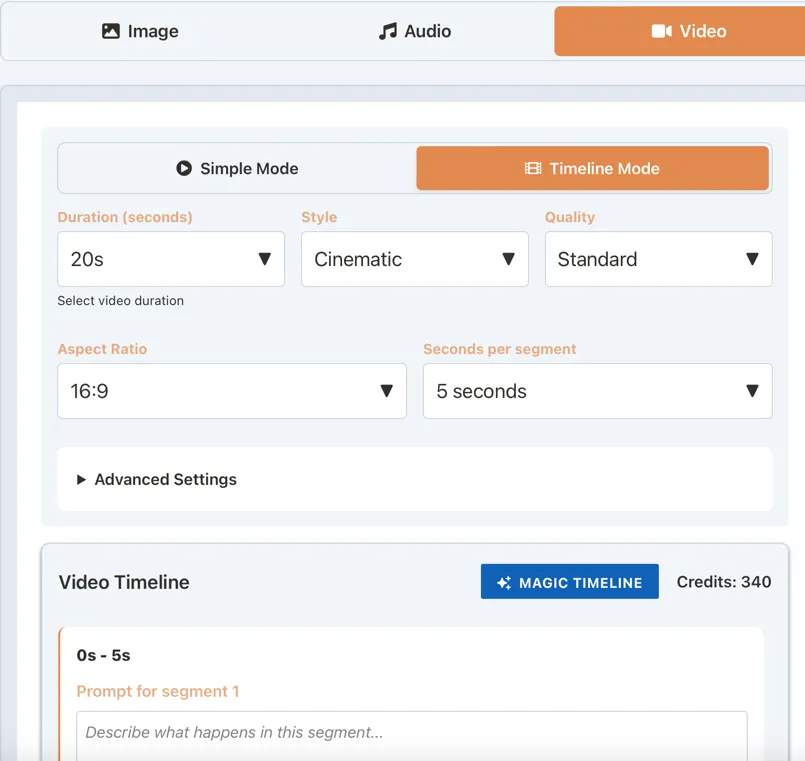
Sequence Mode Workflow
-
Switch to Sequence Mode
- Toggle to “Sequence” option
- Choose total duration (8-60 seconds)
-
Plan Your Segments
- Video splits into segments, the duration defined per segment
- Each segment needs its own prompt
- Plan narrative flow
-
Create Segment Prompts
Segment 1: "Wide establishing shot of futuristic city skyline at dusk" Segment 2: "Zoom into street level, flying cars passing by" Segment 3: "Follow one vehicle through neon-lit streets" Segment 4: "Vehicle lands at sleek building entrance" -
Customize Each Segment
- Different styles per segment allowed
- Optional image attachment
- Individual refinements
-
Generate Sequence
- System processes each segment
- Real-time status updates
- Individual segment videos created
Note: Final video stitching to combine segments is currently in development.
The Magic Sequence Feature ✨
Magic Sequence is like having an AI video producer that plans your entire video, creates the visuals, and sets up your sequence - all from a simple description.
How Magic Sequence Works
-
Click “Magic Sequence”
- Opens the configuration modal
- Preserves all your video settings
-
Enter Your Topic
Example: "The history of space exploration" -
Select Video Type Choose from 11 specialized types:
- Documentary - Educational content with clear narration
- Story/Narrative - Character-driven storylines
- Artistic/Creative - Abstract or experimental videos
- Tutorial/How-to - Step-by-step instructions
- Product Showcase - Highlight features and benefits
- Brand Story - Company narratives
- Explainer - Complex concepts made simple
- Testimonial - Customer success stories
- Problem/Solution - Before/after scenarios
- UGC Style - Authentic user-generated feel
- Educational - Learning-focused content
-
Add Details (Optional)
- Specify visual style preferences
- Include key points to cover
- Mention branding requirements
- Note color schemes or moods
-
Generate Magic The AI then:
- Plans optimal scene breakdown
- Generates images for each scene
- Creates scene descriptions
- Maintains narrative flow
- Returns you to sequence mode with everything ready
Smart Image Generation
Magic Sequence doesn’t just plan - it creates:
- Automatic Image Creation - AI generates relevant images for each scene
- Quality Options:
- Standard: Quick generation for drafts
- HQ: Higher quality for important scenes
- UHQ: Maximum quality for hero shots
- Style Consistency - Images maintain visual coherence
- Scene Variations - Edit mode for image refinements
Example Magic Sequence Workflow
1. Topic: "The evolution of smartphones"
2. Type: Documentary
3. Details: "Focus on major innovations, use tech aesthetic"
4. AI generates 6 scenes for 30-second video:
   - Scene 1: Early mobile phones (brick phones)
   - Scene 2: First smartphones emerge
   - Scene 3: Touchscreen revolution
   - Scene 4: App ecosystem explosion
   - Scene 5: Modern flagship features
   - Scene 6: Future possibilities
5. Images auto-generate for each scene
6. Sequence populated and ready to render
Advanced Magic Sequence Features
Scene Customization
- Edit AI-generated descriptions
- Adjust individual scene durations
- Modify image prompts after generation
- Reorder scenes as needed
Intelligent Planning
- Adapts to your set video duration
- Maintains story arc and pacing
- Ensures smooth transitions
- Balances content across scenes
Credit Transparency
- Shows image generation credits (1-27 per scene)
- Displays video generation estimates
- Total cost calculated before processing
Magic Sequence Best Practices
For Clear Topics:
- Be specific about your video’s main message
- Include key points you want covered
- Mention any must-have scenes
For Visual Consistency:
- Specify style preferences in details
- Mention color schemes or aesthetics
- Note any branding requirements
For Better Results:
- Choose the right video type for your goal
- Let AI handle scene pacing
- Review and refine after generation
Magic Sequence Pro Tip
Magic Sequence is perfect when you have a concept but need help with execution. It’s like having a video storyboard artist, image creator, and sequence planner all in one!
Writing Effective Video Prompts
Essential Elements
Subject: What/who is the focus?
"A red sports car" vs "A sleek red Ferrari"Action: What’s happening?
"driving" vs "speeding through mountain curves"Environment: Where is this happening?
"on a road" vs "on a winding coastal highway at sunset"Camera Work: How should it be filmed?
Add: "aerial view following the car" or "low angle tracking shot"Style/Mood: What feeling to convey?
"cinematic with dramatic lighting" or "documentary style, handheld"Complete Prompt Example
"A skilled chef preparing sushi in a modern Japanese restaurant,
close-up shots of precise knife work, ingredients being assembled,
warm lighting highlighting the fresh fish, steady cam movement,
professional food documentary style"
Advanced Techniques
Negative Prompts
Specify what you DON’T want:
- “no blur, no distortion”
- “avoid text overlays”
- “no watermarks”
- “exclude people”
Guidance Scale
Control prompt adherence:
- 0.0-0.3: Very creative, loose interpretation
- 0.4-0.6: Balanced (recommended)
- 0.7-1.0: Strict prompt following
Image-to-Video
Start with an image:
- Upload or select starting image
- Describe desired motion/continuation
- AI animates from that starting point
- Great for product demos, logos
Draft System
Save and resume work:
- Auto-saves sequence progress
- Return to incomplete projects
- Share drafts between sessions
- Iterate without losing work
Sequence Mode Mastery
Planning Effective Sequences
Story Arc Example:
- Establish - Wide shot sets scene
- Approach - Move closer to subject
- Detail - Show specific elements
- Action - Main event happens
- Resolution - Final shot/conclusion
Transition Tips
- Keep consistent elements between segments
- Match lighting/time of day
- Maintain color palette
- Use complementary camera movements
Multi-Style Productions
Segment 1: Drone style - Establish location
Segment 2: Cinematic - Set mood
Segment 3: Action - Build energy
Segment 4: Slow motion - Dramatic moment
Segment 5: Steady cam - Smooth conclusion
Practical Applications
Marketing & Business
- Product demonstrations
- Service explanations
- Brand storytelling
- Social media ads
- Website headers
Creative Projects
- Music videos
- Short films
- Artistic expressions
- Story visualization
- Concept presentations
Educational Content
- Process explanations
- Tutorial intros
- Concept visualization
- Historical recreations
- Scientific demonstrations
Social Media
- Instagram Reels
- TikTok videos
- YouTube Shorts
- LinkedIn content
- Twitter video posts
Optimizing for Platforms
YouTube (16:9)
- Standard landscape format
- 10-30 second intros
- Professional quality recommended
Instagram/TikTok (9:16)
- Vertical format essential
- 5-15 second clips ideal
- Fast or Standard quality sufficient
Presentations (16:9)
- Professional quality for impact
- 5-10 second segments
- Cinematic or corporate styles
Troubleshooting
Common Issues & Solutions
“Video looks different than expected”
- Add more specific details
- Try different styles
- Adjust guidance scale
- Use reference images
“Segments don’t flow well”
- Ensure visual continuity
- Match lighting/colors
- Plan transitions carefully
- Use Magic Sequence for help
“Generation taking too long”
- Professional mode is slower
- Check internet connection
- Try Fast mode first
- Reduce segment count
“Motion seems unnatural”
- Simplify action descriptions
- Avoid impossible physics
- Reference real movements
- Try different styles
Best Practices
Do:
- Start with 5-second tests
- Be specific about movement
- Save successful prompts
- Plan before using Sequence mode
- Download important videos
Don’t:
- Request text in videos
- Expect perfect lip-sync
- Use copyrighted characters
- Overcomplicate single scenes
- Ignore aspect ratios
Integration with Other Media
Add Voiceover
- Generate video first
- Create matching audio narration
- Combine in video editor
- Perfect for explainers
Create Thumbnails
- Generate video
- Extract best frame
- Use Image Generation for thumbnail
- Maintain visual consistency
Build Campaigns
- Generate multiple video variations
- Create supporting images
- Add music/voiceover
- Complete media package
Your Video Journey
Ready to start creating? Follow this path:
-
Practice Clip Mode
- Create 5-second clips
- Try each style
- Learn prompt writing
-
Master Prompting
- Study successful examples
- Build prompt library
- Understand styles
-
Explore Sequence
- Start with 2-segment videos
- Practice transitions
- Build to complex stories
-
Develop Style
- Find your preferences
- Create consistent content
- Build video library
-
Share & Iterate
- Get feedback
- Refine techniques
- Push creative boundaries
Ready to Create!
Start with a simple 5-second video. Describe something you’d love to see, pick a style, and hit generate. In minutes, you’ll have your first AI video!
Related Resources
- Image Generation Guide - Create video thumbnails
- Audio Generation Guide - Add voiceovers
- Media Overview - Complete media system
- Workflow Guide - Automate production