Image generation is cool. But sometimes you already have an image and just need to fix or change something.
That’s where edit modes come in. DatBot has 10 of them.
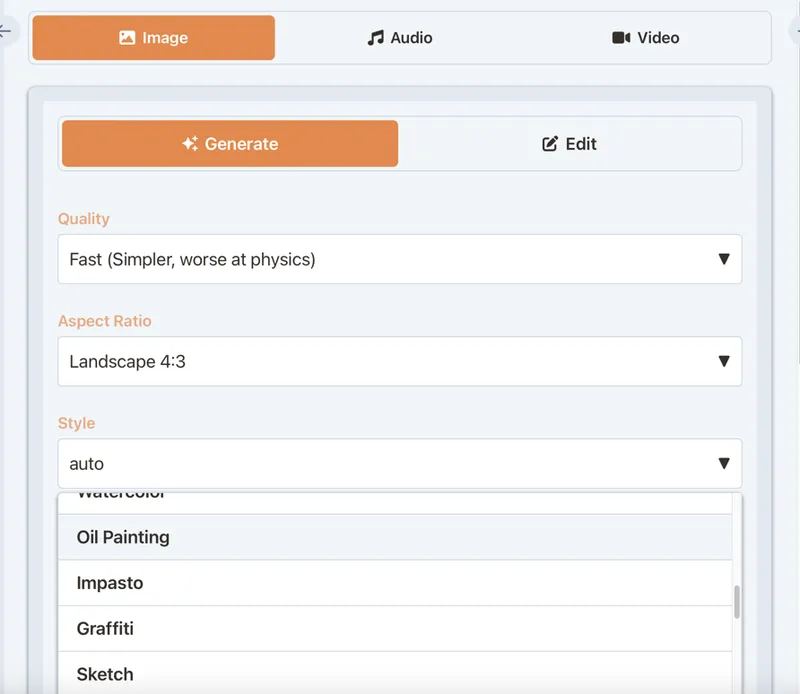
How to Access Edit Mode
- Go to Media → Images
- Switch from “Generate” to “Edit” tab
- Upload your image
- Pick an edit type
- Add instructions if needed
- Generate
Now let’s go through each mode.
1. None (General Edits)
What it does: Applies whatever instructions you give. No specific transformation—just follows your prompt.
Use when: Your edit doesn’t fit the other categories.
Example prompt: “Add a sunset in the background” or “Put a party hat on the dog”
2. Enhance
What it does: Improves overall image quality. Sharpens details, improves colors, reduces noise.
Use when: Your image looks a bit soft or low-quality.
Example: Phone photos that could use some polish.
Note: Works with one image at a time.
3. Upscale
What it does: Increases resolution. Makes small images bigger without turning them into blurry messes.
Options: 2x or 4x size increase.
Use when: You have a small image that needs to be larger.
Example: That 400px thumbnail needs to be a 1600px hero image.
Note: Works with one image at a time.
4. Colorize
What it does: Adds realistic color to black and white photos.
Use when: You have old B&W photos you want in color.
Example: Grandma’s 1950s wedding photo.
Note: Works with one image at a time. AI guesses colors based on context—results vary.
5. Restore
What it does: Fixes old, damaged, or degraded photos. Removes scratches, repairs tears, fixes fading.
Use when: You have vintage or damaged photos.
Example: That water-stained family photo from the 80s.
Note: Works with one image at a time. Major damage may need multiple passes.
6. Remove Background
What it does: Cuts out the subject and removes the background. Makes it transparent.
Use when: You need a subject isolated for use elsewhere.
Example: Product photos for your website, headshots for profiles.
Output: PNG with transparency.
7. Remove Object
What it does: Erases something from the image and fills in the space naturally.
Use when: There’s something in the image you don’t want.
Example prompt: “Remove the person in the red shirt” or “Remove the trash can on the left”
Tip: Be specific about what to remove. “Remove clutter” is too vague.
8. Replace Background
What it does: Keeps the subject, replaces everything behind it.
Use when: Great subject, bad background.
Example prompt: “Replace the background with a professional office” or “Put them on a beach at sunset”
Tip: Describe the new background in detail.
9. Fix Lighting
What it does: Corrects lighting issues. Brightens dark areas, tones down overexposed spots, balances overall exposure.
Use when: Good photo, bad lighting.
Example: Indoor photos that are too dark, outdoor photos with harsh shadows.
10. Stylize
What it does: Applies an artistic style to your image. Can make photos look like paintings, cartoons, etc.
Use when: You want to transform the aesthetic.
Example prompt: “Make this look like a watercolor painting” or “Convert to anime style”
Tip: Combine with a style preset for more control.
Quick Reference
| Mode | Best For | One Image Only? |
|---|---|---|
| None | Custom edits | No |
| Enhance | Quality improvement | Yes |
| Upscale | Making images bigger | Yes |
| Colorize | B&W to color | Yes |
| Restore | Fixing old/damaged photos | Yes |
| Remove Background | Isolating subjects | No |
| Remove Object | Deleting unwanted things | No |
| Replace Background | New backgrounds | No |
| Fix Lighting | Exposure/lighting fixes | No |
| Stylize | Artistic transformations | No |
Tips
- Quality matters for edits. Higher quality settings give better edit results.
- Be specific. Vague prompts get vague results.
- Combine modes. Restore an old photo, then colorize it, then enhance it.
- Original is safe. Edits create new images. Your original stays untouched.
- Credits vary. More complex edits use more credits.
Common Issues
| Problem | Solution |
|---|---|
| Edit looks wrong | Add more detail to your prompt |
| Upscale looks blurry | Try 2x instead of 4x, or use Enhance first |
| Background removal has rough edges | Use higher quality setting |
| Colorize looks unrealistic | It’s AI guessing—some images work better than others |
| Object removal left artifacts | Be more specific about what to remove |
That’s the full edit toolkit. Stop settling for “good enough” photos.